


by Guest Contributor Brenna Gentry
Photographers have many roles & talents, but in my opinion a discerning eye is probably the most valuable. You may or may not come by this naturally, but either way it can/should be developed & trained. I find my ability to quickly decide what works/doesn’t to not only help me in setting up my shot, but guides me completely through my post processing workflow. Not everything can be perfectly planned out & most of the time we find ourselves having to work with what we have & make it look GOOD. Below is a complete evolution of a recent image. Hopefully it will help you think about your own thought process & how you can modify it to get the most out of whatever setting you are in.
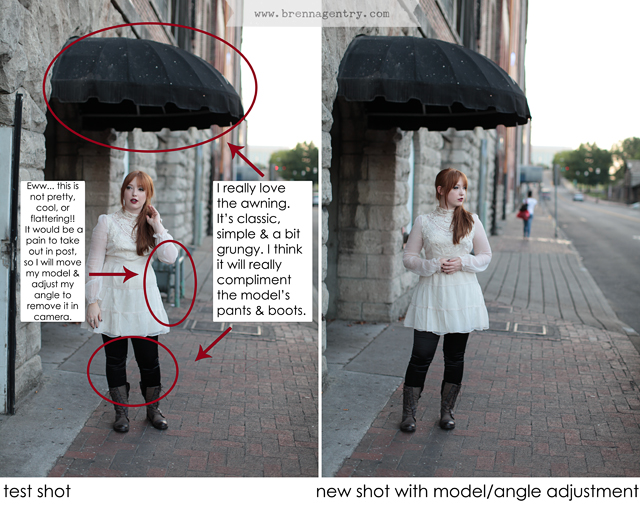
SETTING UP: I found myself in a part of town I hadn’t shot in before or ever even scouted. So what do I do? We walk….and walk.. and walk. As we walk we will stop if something catches my eye. What am I looking for? Light first & location second. I already have a certain look in my head, developed from the styling. I just need good light & the RIGHT spot. I find it…. it’s random & nothing special alone, but is PERFECT for my look & the vision in my head. There are just a few problems I have to deal with.. and more importantly I have to decide if it is worth it in the long run. For me, I thought it would be worth it. This image did require a lot of work. Way more work than most of mine, but sometimes those are my favorites:)
STEP 1: Testing the location, finding what I like & don’t like about it. Then adjusting what I can in-camera to help me in the post processing.
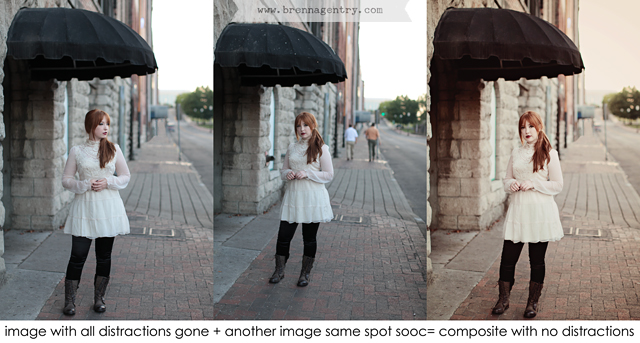
STEP 2: I am now in Photoshop ready to work on my image. I give it a quick crop & rotate before I do anything else. Then it’s time to use that discerning eye to get rid of any distractions I had no control over while shooting. I am a strong believer that small details make the biggest difference & can greatly improve an image. In this case we had to cover several blocks in a short amount of time so the luxury of waiting for people/cars to pass wasn’t available.
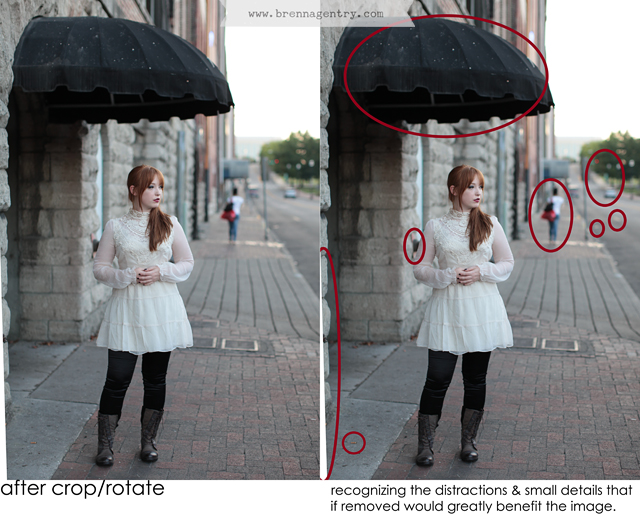
STEP 3: Huge difference, right?

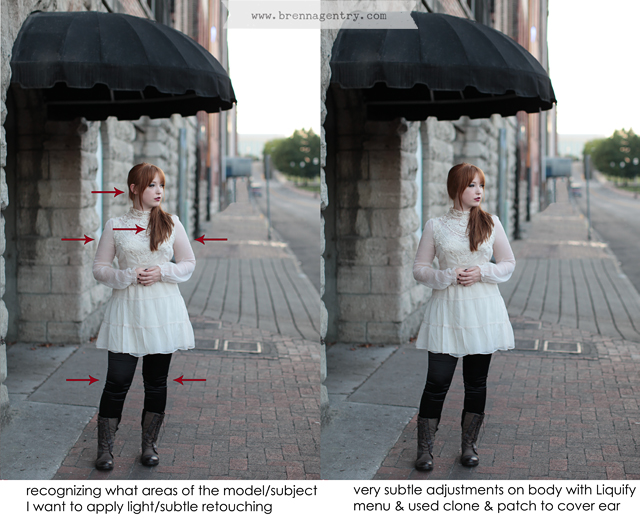
STEP 4: The next step is similar to last, but instead focusing on the model.

STEP 5: Fixing this was quicker than the last one. Just making sure the model looks her best & fix the ear distraction. This is something I would usually make sure was fixed while shooting, but the wind that day was not being nice.
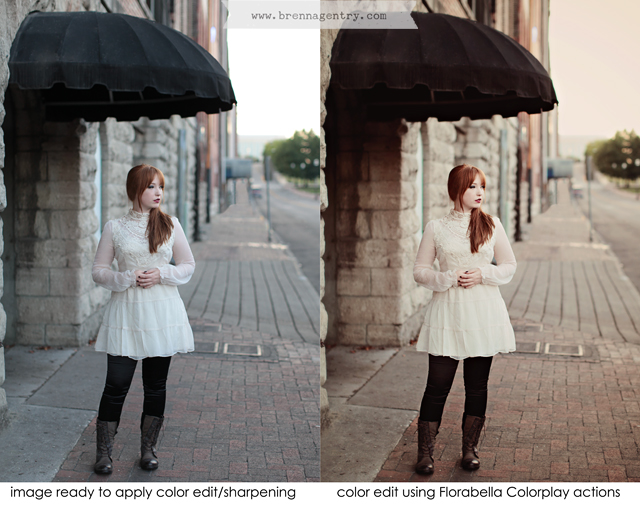
STEP 6: Now the image is ready to do any color editing I want. I already had a look in mind while shooting that went along with my vision. So I accomplished the colors/tones using Florabella’s Colorplay Actions(read my review of the set).
So here we are at the before & after:
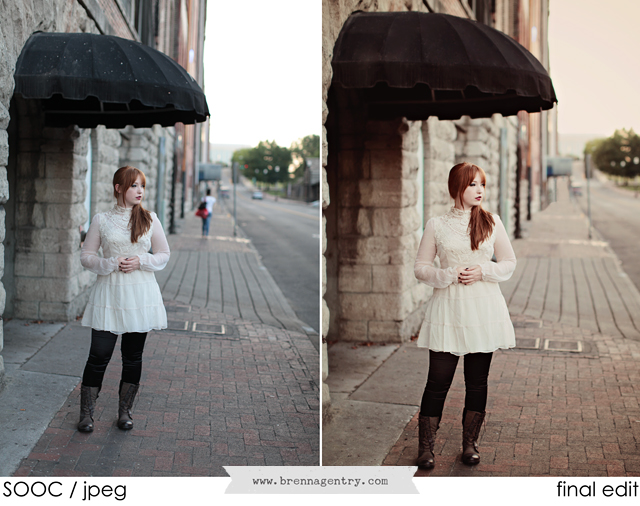
Do I still think it was worth all the work? ABSOLUTELY. Now, say you have more than one image you want to use from the same spot? Do you want to do all that work on the other images too? Probably not, I know I didn’t. So get the most out of your work & don’t fear using a composite image to cut editing time down.
So the next shoot you go on keep an eye on the details. The WHOLE image & not just the subject. Envision what your post production workflow is going to be & cut out what you can in-camera. Once you are in Photoshop start the whole process again. Soon enough you will not even have to think about it & just automatically know what to do & what works or doesn’t.
![]()
 Brenna Gentry specializes in stylized portraiture & online photoshop mentoring for photographers. She holds live online photoshop classes twice a month & also offers 1-on-1 photoshop classes for a more customized experience. Want her to edit one of your images? Follow her on Facebook for the weekly “You SEND it, I’ll SHOP it!” event.
Visit her WEBSITE | FACEBOOK | BLOG pages


Excellent ‘eye-opening’ tutorial. It’s all about seeing, isn’t it?
Love this. I don’t see your review for the Florabella Colorplay actions… I’d love to read that.
Thank you Joan:) Stephanie the link for the review is here: http://www.brennagentryblog.com/2012/08/florabella-colorplay-action-review.html
Brenna, thank you so much for you step by step walk through. It is helpful and reassuring that some photos are worth all the work. Did you save a copy of the picture after all the fixes and before the color change so you could do the composite or did you do the entire edit with color change then do the composite?
This is wonderful! Thank you! I am just starting out but I love thinking about the “big” picture. Thank you for sharing.
Thank you Jessica & Jenn:) Jessica- I saved a copy of the image with all of the fixes, but pre color edit. I made the composite & then edited it as well:)
Thank you SOOO much for posting this. I struggle with getting so caught up that I forget to think about those details while shooting and this week I am going to make it my goal to slow down and process those before snapping away!
Thank you for this step-by-step look at your process. So helpful! I find often times that I’m rushing my shots or hurrying along b/c I either a) don’t want to “inconvenience” people and take too long or b) I shoot a lot of families/kids and don’t feel like I often have the “luxury” of taking my time. Does that make sense? How can I work around these obstacles (that I truly realize I create for myself)??
Thank you Jessica P. & Amanda:) It is hard to slow down sometimes & of course there are times when you do have to rush. My suggestion would be to keep practicing talking yourself through each set up. Eventually you will be able to process things in your head a lot quicker & it won’t take as much time. Also, please know that it is okay to take your time while shooting. You are in charge & you can set the flow. Of course when working with kids it’s a bit more challenging.. but redirect until you get what you want, if you feel it is worth it for that shoot/shot etc. 🙂 Good luck! Glad you like the article!