• Pretty Forum
  • Pretty Presets
  • Pretty Actions

Pretty Forum

Online Photography | Forum | Workshops | Tips | Tutorials | Classes | Business | Courses | School

  • Home
  • Blog
  • Enter Forum
  • Workshops
  • About
    • Meet the Team
    • FAQ ABOUT JOINING THE PRETTY FORUM
    • WHY JOIN THE PRETTY FORUM
    • Testimonials
    • Privacy Policy
    • Site Terms and Conditions of Use
  • Advertise
  • Contact
  • Join

Guest Contributor

Full frame’s Dirty Little Secret

by Guest Contributor Elizabeth Halford

If you’re currently coveting a full frame camera, you may have been had by possibly one of the most clever and conniving marketing campaigns the photography world has ever known.

“Full frame” sensor digital cameras were invented in the early turn of the 21st century. Contax brought out their “N Digital” and removed it within the year. After that in 2002 was Canon’s 1Ds and it was a whopping 5 years before Nikon brought out their first ‘full frame’ in 2007 {the D3}.

It’s debatable who first coined the term ‘full frame’, but I’ve always felt safe in assuming that it was Canon since they basically invented the first full frame DSLR. But why call it “full frame”. Well, that’s the secret…there’s nothing ‘full’ about it.

It might be surprising to many to realize that it’s only been 10 years since these cameras were first available since many of us have only been in this long enough to only have ever known digital. But even the 5D everyone drools over was only first released in 2005. Before that, we had digital cameras whose sensors weren’t big enough to capture the equivalent of 35mm film.

And so Canon set out to invent a sensor that was capable of acting like 35mm film, but they couldn’t come up with anything that was priced low enough for anyone to be able to afford. Until 2002 of course. But then, what they had was a camera which cost exponentially more than any other DSLRs. So how were they going to get the world to believe that they needed this 35mm equivalent DSLR?

Canon’s ultra large scale CMOS sensor {left} vs. Canon’s 35mm equivalent “full frame” sensor

“NOW which sensor is full, eh?”

{the answer}

Instead of calling it what it really was: “35mm equivalent”, they called it “full frame”. And -voila!- suddenly, every other camera became…well…not full. And if something’s not full, it’s…that’s right…EMPTY! Bravo, Canon! Now we feel like crap.

So let’s break this down. Full means ‘maximum’, right? Like as in: ‘reached a pinnacle’ or ‘can’t get any bigger’. In fact, this is a ridiculous word to attribute to this size of sensor because there are sensors that are WAY bigger than the 35mm equivalent sensor you find in, say, Canon’s 5D cameras. They might not be readily available in the consumer markets, but they exist. And Canon even makes them. And what about medium format DSLRs like those available from Kodak and Pentax? You might need to sell a kidney, but they’re definitely available and as you can see, their sensors are way bigger than what we’ve come to known as “full frame”.

In terms of imaging sensors, bigger will always be better. I have a Canon 5DmkII and honestly, it was like seeing for the first time. But each piece of photography equipment available has a purpose. My backup camera is a cropped sensor 7D and I love it, too. I just wanted to talk about this today to squash the delusion that Canon have built up to tell photographers that if they don’t have a ‘full frame’ camera, then they have an empty one. If you feel all tangled up inside because you’re being made to believe that your camera is inferior, DON’T! Even the “full frame” is a pea-brain compared to other sensors available.

blog_separator

About the Author: Elizabeth Halford is a professional photographer and blogger. She gives real photography advice in real.plain.english. Visit her on Facebook and join a community of photographers just like you!


Tweet


13 Comments

Photographer Spotlight

Photographer Spotlight: Brooke Logue Photography

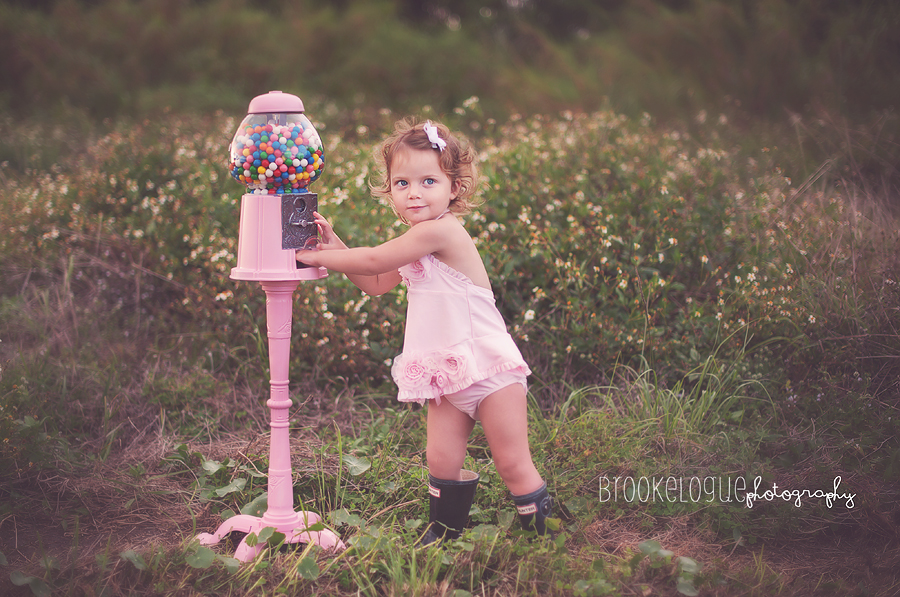
We are so excited to introduce you to Brooke from Brooke Logue Photography on the Blog today!  Take a moment to learn more about Brooke and visit her website Brooke Logue Photography today!   Thank you so much Brooke for taking the time to share your work with us!

How do you balance your business and family life?

Balancing family and business life is a constant challenge I face every day. As much as I love to work, and am so passionate about what I do, I also have to make sure that I am working around my family life. As a photographer, you are setting your own schedule, whether it be working or “playing,” so discipline is extremely important to maintain sanity and maintain a timely production. I have set times during the day that are scheduled for my work time. For instance, my daughter is in school everyday until 3 and my one year old naps twice during those times. Nap time, is strict work time. If I don’t focus, and take advantage of being productive, nothing will get done in a timely manner. When my children are awake, or home from school, I am all theirs, until bed time. This leads me to doing most of my editing and work after the 8:00 pm hours. This way, I still get to do what I love to do, and not take time away from my family.

What is the best way you’ve found to promote your business?

Word of mouth, and the wonderful world of facebook.

What is your favorite age to photograph, and why?

My absolute favorite ages are from 4-9. I really enjoy child portraiture, and capturing the true essence of children. It is a little bit more of a challenging age group as well, because that’s where you have to try and steer clear of those fake cheesy smiles that moms know are fake! Be silly, jump, shake, twirl, even with older kids. Play “modeling” with the older girls and act silly. You would be surprised but these kids will open up for you like they are standing in front of their mirror in their own bedroom. It will make the difference between a stiff posed image, and a moment captured.

How important are props and do you have any favorites?

Props are so fun to me. I always add props to a session, but I only use the props for maybe a quarter to half the session. Props give your clients’ finished gallery a little bit more variety. Props can also tell a story, or portray a meaning or time of that individual’s life. However, I make sure to shoot many images with no props, because simple timeless images sometimes speak the most to the viewer. My advice, is to not let the props overcome the session. Remember, the attention should be on your subject, and props have the ability to take the attention away from the subject.

How do you encourage clients to invest in your products? And how do you convey the value of your products to your clients?

I feel as if my art conveys the value of itself, and therefore, I don’t have to do the conveying. You get what you pay for in this world, right?  I actually am on the higher end of the price scale in my area, for child portraiture. My pricing is on my website, some disagree with this, but honestly, it saves me the time of having to “sell” myself. Most everyone who contacts me, has viewed my pricing, and are okay with the overall investment.

What do you do to make your clients smile and give you a true laugh?

Oh, if I told you this, it would be embarrassing. I have been known to act like a complete goofball, make weird loud noises (works best for 6 month olds who are so engaged with the grass), act like there is something on my camera and jump back acting really scared (kids love this but makes for a challenging way to shoot at at 1.4 aperture, due to all my moving. If the photographer is relaxed and acting silly, the subjects will loosen up and feel more comfortable. And if all else fails, make everyone stand up, and shake and wiggle your body! Im serious! This makes for lots of good laughs, and really really helps loosen people up, and welcomes a more comfortable environment. Sometimes the only way to capture real, is if you, the photographer, are 100% real yourself.

You have such beautiful lighting in all of your pictures. Any tips or tricks on achieving such a beautiful look?

I personally think, that the use of light in a photograph can be the ultimate factor of whether that image is spectacular or awful. It is also the determining factor of the way the viewer may feel when viewing the photograph. My number one piece of advice, is pay attention to lighting, and pay attention to how the light falls on your subject’s face. Light can be used to give the viewer different feelings or perceptions of what they see in an image. Light can change the mood of an image. For example, deep shadows casted over half a persons face gives the viewer a different feeling than a backlit portrait with no shadows on the face. It simply changes the mood of the portrait. Using light, to determine the mood of the image, and the way the viewer will feel when looking at the image, is what will separate a plain old photograph with a photographic masterpiece. This ultimately separates the photographer with the artist.

For me, I prefer shooting in the last hour and a half of sunlight. Beautiful golden hour light helps achieve that golden red and orange tones that you see in my images. I normally shoot my sessions in the evening time, during the last hour and a half of sunlight. Morning sessions are only good if you catch the light as it’s rising, otherwise, as it gets later, the sun gets too harsh. The absolute perfect shooting time is from about 30 minutes before sunset, through about 15 minutes after sunset. Those 45 minutes are divine, and as long as it is sunny out, and you know how to use light to your advantage, those golden rays can turn any old your photograph into stunning art. 

What camera do you shoot with? What is your favorite lens?

I shoot with a Nikon D700, and my favorite lens is the nifty fifty 1.4. It never fails to impress me

What is your style and how did you create it? Was it something you had from the beginning or something you grew into?

My style is warm, whimsical, informal and natural. My style has evolved over time, into what has become my own. Of course I have been inspired by many other amazing photographers, but at the same time, I have always remained true to myself. To me, this has meant, to shoot with expression, to shoot with meaning, to shoot with soul.

Where do you see yourself in 5 years?

I still see myself as a mother, a wife, and a professional photographer, however, with 5 years more experience and wisdom, than I have now. oh, and maybe a couple more kids 

blog_separator

My name is Brooke Logue Gomberg and I am the owner of Brooke Logue Photography & co-founder of Baby RAW. I am the very blessed wife of the most incredible man in the world, and together we created something beautifully amazing- A Family. We have been blessed with two beautiful children, Maren (3), and Zane (1). Maren was my very inspiration for beginning my journey in child photography. My family is my biggest inspiration for everything I do in this life, and I feel like the luckiest girl in the world to have them, always surrounding me with their love and support


Tweet


6 Comments

Guest Contributor

How to Create Actions in Photoshop

 by Guest Contributor Anna Gay

If you are new to Photoshop, you may find yourself repeating the same steps over and over again, because you like the effect that certain adjustments have on your photos. By now, you have probably heard about Photoshop “actions,” which are basically just a series of steps that, by pressing one button, will be applied to your photo – very similar to a Lightroom preset. You can easily create your own actions in Photoshop to simplify your workflow!

Keep in mind that actions cannot be written in Elements, unfortunately, they can only be written in Photoshop CS. However, actions can be written in CS that can be used in Elements, so if you want to download pre-made actions online, be sure that you download the actions that are specifically for Elements.

For now, let’s look at how to create an action in CS.

First, make sure your Actions palette is open by going to your top toolbar and selecting Window, Actions, and a check mark will appear next to the word Actions. You should have a palette similar to the above photo open on the right side of your screen.

Click on the folder icon, Create New Set

You will then see this box, at which point you can rename your folder if you want for easy identification, especially if you have a lot of actions stored in Photoshop.

 With your new set selected, click the Create New Action icon, circled above.

Again, you will have the opportunity to name each action within the set. Now, click Record. From this point forward, Photoshop will record everything you do.

The best thing you can do when you are writing actions is to work with Adjustment Layers. So, every time you want to apply an effect to your photo, select Layer, New Adjustment Layer, and then the type of adjustment you want to make. That way, when you are finished recording your action, all of your layers will remain visible, and when you use the action in the future, you’ll be able to tweak each layer, depending on what works for the photo. If your action works on one photo, chances are it may not work exactly the same on the next, but with the layers remaining open, you can make small adjustments to each layer, if need be. When you are through writing your action, press the Stop button, circled above.

Finally, when you want to play your action, simply click the arrow next to the set you have created for your actions, and then select the action you wish to play. Then, press the Play button, and your action will repeat every step that you have recorded!

blog_separator

Headshot (2)Anna Gay is a portrait photographer based in Athens, GA and the author of the dPS ebook The Art of Self-Portraiture. She also designs actions and textures for Photoshop. When she is not shooting or writing, she enjoys spending time with her husband, and their two cats, Elphie and Fat Cat.



Tweet


1 Comment

Celebrity Mentor Photographer Spotlight

Photographer Spotlight + Celebrity Mentor: Spanki Mills

We are so pleased to welcome Spanki Mills to the Blog today!  Take a moment to learn more about Spanki and visit her website Spanki Mills Photography today! Spanki will be our FIRST “Celebrity Mentor” in the Pretty Forum for the entire month of April, so come on over and ask Spanki anything you like.  Thank you so much Spanki for taking the time to share your work with us!

Where did your inspiration for photography begin?
I am just like every other mother out there.  My children!! I was in photojournalism and yearbook in high school. I was known as the one with the camera at any function we had. I have loved pictures from early on.  Not as much for the art, but for the memories. I have always been more of an artist, it just never “clicked” that I could express creativity through pictures until my last child was born and I started playing with my camera. It was then that I fell in love with the possibilities.

How would you describe your photography style?
I am very simple. I do not use props, but I love color so I tend to chose locations that have colors and textures in them, but keep the client the main subject. My favorite work are my images that are very simply stated with either bold colors or rich textures. I am also finding my love for light, I love a few soft lit images too.

Did you study photography in school or are you self taught?
Although I did start out with my fathers film Canon and should know a lot more technical than I do, I am completely self taught. I have a strong personality and photography has been something that has captured me. I will not let it beat me, so when I get frustrated I will walk away – but always end up coming back and trying again and again until I figure it out!  For some reason when it takes a few mess ups to get it right, the lesson is easier remembered next time! 😉

Do you shoot Canon or Nikon, and what is your favorite lens?
Like I said I started out with a film Canon, so Canon was all I knew. I went to digital and continue to stick with it. For 3 years I shot with a Canon and just this last winter I did it… I jumped ship – I bought a Nikon!  NOW, do not stone me… I had “the grass is greener” envy. I studied them so hard that I could tell when pulling up a photographers blog immediately what camera they shot with (I was only stumped with 2 photogs – my hunch was right on one and wrong on the other) and for my style of shooting I felt like the Nikon might fit me better. SO – I did it, and I do not regret it.  BOTH cameras were great and I was actually shocked at how closely they shot.  My favorite lens is still the 50mm 1.4 hands down my favorite! I have the 85mm and the 35mm and love them both but if I were only allowed one lens (which until recently that is all I had) it would be the 50mm!

You specialize in High School Senior Photography, what is your favorite aspect of photographing seniors?
You know, as much as I love children I still can not get that excitement from a children’s session like I do a senior. There is something about a controlled session that I can’t get enough of (maybe it is because I have 4 kids and my life is never in control)!  I love every aspect of it – from the very beginning conversation, to watching their personality unfold in front of me with clothing and location choices and turning the vision into reality.  I look back on that year of my life as one of my favorite times, it was such a special time and I love being able to capture that time in their lives for them to hold on to forever.

What is a good lesson you have learned this year in photography or in your business?
BIGGEST lesson to date… anything that goes wrong, in the end it is MY fault! Sometimes I like to think I might have a difficult client, but in reality it is because I have left something unclear. I have tried to leave no rock unturned so there is no room for confusion and question.  BUT, I still run into situations that I wish I would have addressed BEFORE it came into question.  So what I do now is immediately fix it!  I will go change my email templates or website info so it won’t happen again.

If you could encourage a new photographer in one area, what would it be?
Take some time to really find who YOU are!  I think educating yourself is so important. You have one chance to make a first impression.  But, in doing so make sure to keep an open mind when going to workshops or being mentored. You can take every bit of the information and make it work for you. Let your images speak for who you are as a photographer and artist. It is sooooo easy (I know I have done it) to see someone’s work you admire and without even knowing you end up mimicing them. Whether it is actual photographs or blog post or fb statuses, remember to be you… if you love you everyone else will to! And remember it takes time.

What do you love most about being a photographer?
Oh my there is sooo much, and I could say the expected “capturing the moments” but for me the thing I love the MOST, are the friendships I have made. I have seriously come across some of the most awesome people during my journey. Some of my clients have turned into my best friends, and some of the girls I have mentored are now girls I turn to when I am having a rough day, or friends I have made in the industry when I have a question or need honest advice.  I have been so blessed by my growing circle of friends and that alone has given me a new love for this business.

Where do you see yourself in 5 years?
Oh that is hard. I hope to still be shooting what I love. I hope to still be teaching because that is really where my heart is but really I can not even picture what tomorrow holds, so 5 years is WAY out there!

blog_separator

About Spanki: My REAL name is Spanki! I will go by just about anything…Stacy, Becky, and Sparky are what I get the most often. (I guess no one really thinks they hear right when I say Spanki). I am a thirty “something” mother of 4 (if you don’t include my husband who acts 12 most of the time)! I have 3 boys one 11yr old, twin 10yr olds, and a daughter AKA the “boss” who is 5 (and to think I was told I couldn’t have children) pshhhh!

I am no good at math, or spelling…I tend to make up words. My poor friends and family have learned they have to de-code me! I have no problem laughing at myself! I sing really good when my radio is REALLY loud, I still think I can cheer just as good as the girls who can actually FIT in their uniform, and there is never a dance competition I won’t break it down in!

Visit Spanki at her WEBSITE, BLOG, and FACEBOOK page today!

And don’t forget, you can “Ask Spanki” anything you like in the Pretty Forum for the entire month of April!


Tweet


2 Comments

Guest Contributor

5 Tips to Being Successfully Self-Employed

by Guest Contributor Shannan Painter

At the age of 20, I was only a few weeks into my first 40 hour, 8-5 desk job, when I knew I wanted something different.  After working random jobs just long enough to finish college and start my own business, I didn’t think I could ever go back to working for “the man”. Sure, I don’t get paid vacation, sick leave, or have someone to do my work while I’m gone. But, I do have the flexibility to work from home, spend more quality time with my family, and go on vacation whenever I want to. Being your own boss certainly has its perks, but it also comes with some unique challenges. Here are a few tips for planning for those challenges before they arise.

1. Set Boundaries

One of the toughest things about being a business owner is separating work and personal life. Thanks to technology, we now feel that we should be able to get a hold of people 24 hours a day, 7 days a week. Our phones have become another limb attached to our bodies, enabling us to be reached via email, text or phone call at any given moment. (Remember when we only had phones at home, and if we weren’t home, people just left a message?!) Just because you work from home, doesn’t mean people are entitled to expect you to respond at all hours. It’s okay to be “closed”. Can you imagine how ridiculous it would look if someone went to Taco Bell at 4am, stood outside the door, tapped their foot in disgust, and then blasted the restaurant’s customer service for not attending to them until they opened at 10 am? Yet, that is what we have taught ourselves. We expect customer service at our beckon call. How can you provide good customer service without it running your life? Make a plan and communicate effectively. Sit down with your spouse, or decide for yourself when you need to have personal time. You can set your email with an auto-reply letting people know you are out, but will respond as soon as possible. When you are having personal time, don’t check your email! Be fully present at work, and be fully present at home. If your business has exploded to the point that you need constant accessibility, hire someone to help!

2. Dealing with Difficult People

I waited tables for years to put myself through college. It was long enough to learn that people can be challenging. When you run your own business, remember that it is easy for people to say things in email that they might not say to your face. Rather than react, offer some sincere kindness, and do what you can to remedy the situation. After you’ve done that, let it go. Anyone else who has worked in the service industry knows that sometimes there are some people that you can’t please. Sometimes you just have to thank them for their business and send them on their way. Other times, people are very gracious, and the situation can be fixed with just a little effort.

3. Plan, plan, plan 

Schedule as much as possible and get it in writing. Take a look at your whole week before it starts. Write in any appointments you have, and then block out time you need to do things like editing, making phone calls or working on your accounting. Time management is one of the MOST IMPORTANT skills you can master in running your own business. No one is going to get onto you if you don’t keep your books up-to-date, but that doesn’t mean that they don’t have to be done. Schedule a time at least once a month to enter business expenses. If you find yourself swearing every year that it will get better the next year, try this little trick: Put your vacuum cleaner by your computer. Think about how clean your carpet would be if you only vacuumed as often as you did your bookkeeping. If that thought makes you cringe, it’s time to get on top of things!

4. Don’t Spend All Your Money: 

When you receive a paycheck, your employer withholds taxes for you. It takes some discipline to set that money aside when you receive income without taxes withheld. When you own your own business, you pay self-employment tax of 15.3% of your net income (revenue minus expenses). On top of that, your business income is taxed at whatever marginal tax rate you fall under personally. As a rule of thumb, it’s a good idea to set aside at least 25% of your net income from your business. If you set aside too much money, congratulate yourself on starting a savings account! If you are worried you aren’t putting enough aside, talk to a CPA about making some estimated payments throughout the year.

5. Keep Learning

Finally, remember that to stay competitive, you have to stay sharp. Attend workshops, read books, participate in forums, and talk to other business owners to keep learning and growing. Running a business is a learning process, but then, so is life! Live and work with passion!

Need help with your accounting? Check out our SNAPSHOT SPREADSHEET to organize business finances. Just starting your business? Our Business 101: Setting Up Shop study-along guide will walk you through what you need to know to be established as a legitimate.

blog_separator

About the Author: I graduated Magna Cum Laude with an Accounting Degree from the University of Montana. Instead of pursuing a career in public accounting and being stuck behind a desk for 70 hours a week, I turned down jobs at big accounting firms to pursue a different love. I chose instead to work from home where I live with my husband, two boys and a puppy named Growler. I live a glamorous, exciting life working from my living room in my pajamas, cleaning crayon off the walls, driving kids to school, playing superheros and taking care of a little dog that likes to refinish furniture with his teeth. I get to work with fun, creative & artistic photographers and help them understand that numbers can be our friends!

Visit Shannan at her website Accounting for Photographers, and on her Facebook Page today!


Tweet


5 Comments

Business & Marketing Guest Contributor

“The Dressing Room Sessions”

by Guest Contributor Terra Dawn

So…my sister and I had this epiphany a few months ago.  We were trying to figure out how to cut out time spent in some areas of our business in order to be able to focus more on what we do best! Photography and Marketing, right?

The conversation went something like this:

Niki: “Can you cut out the engagement sessions?”

Me: “Ummm….absolutely not.”  (I am pretty emphatic about the importance of getting to know your clients PRIOR to the wedding day!)

Niki: “Well, how much time do they take up?” She countered.

Me: “A lot. There’s the shooting which takes anywhere from 3-5 hours with travel time included.  Then there is the editing which takes another 3-4 hours.  Oh!  And the initial meeting with the couple which takes an hour!”

Niki: “Sooo…you’re talking 6-10 hours total on a product they will probably only use 10 images from?”

Me:  I shifted uncomfortably…”Maybe….BUT THEY ARE IMPORTANT!!”

She just gave me that stare she normally gives when I’ve said something reduntant and slightly beside the point.

Niki: “Well, is there a reason why you can’t shoot them at the first meeting for a shorter time period?”

Yeah…..you can say it.  DUH!!!  MY SISTER IS A GENIUS!!

So, we now offer what we call “The Dressing Room Sessions”.  When I sit down to meet with a client for the first time, I bring my camera.  I photograph the couple for about 30 minutes…and then for 30 minutes we sit down and talk logistics for their big day.

So far I’ve booked EVERY single client from the Dressing Room Sessions.  Why?  Because when they leave with images from me, they have nothing to compare with other photographers.  I come out the clear winner every time!!

There ARE a few rules that I follow to make sure I’m not wasting my time with clients who might just want a free photo shoot:

1. Within 24 hours of the meeting I send my clients a gallery of around 15 images from the mini shoot, resized at 72dpi and watermarked for Facebook.
2. If they decide to book me, I ALSO give them a gallery with these images in full resolution WITHOUT the watermark.
3. If they decide NOT to book me, but want a few of the images in high res to use for “Save the Dates” and whatnot…those files are totally purchasable!

PROS of “The Dressing Room Sessions”

  • Now I don’t have to work on 75 photos from a five hour photo shoot!!  Seriously!!  15!! Done in one hour!!!  ONE HOUR I TELL YOU!!!!!!!!
  • When you meet your clients, you get to meet them in fun places!  I’ve met clients for meetings at The National Zoo, Old Town Coffee Shops, at the Capitol Building…AT NIGHT!!! Plus, they ALWAYS come dressed adorably!!!  They are getting their photo taken…so they have to look goooood. It gives YOU a glimpse into their personality.
  • The client gets to know me both behind the camera AND in front of the camera.  I wear many different hats in my business, and it’s important they get to know all of my public faces.
  • I’m not trying to pull poses out of my butt two hours into a photoshoot.  You know what I’m talking about!  I put the couple through 3-4 different poses…which turn into motivation for a few “thought up on the spot” poses.
  • I’ve found that with the limited time we are shooting, my creativity actually pushes a little farther.  I prepare a little more before hand with shots that are a little more artistic!
  • You WILL book the majority of these sessions. Other photographers will sit down and talk a couple’s ear off.  “Oh yes.  We will be there to photograph every amazing moment of your unique…blah, blah, blah, blah, blah.  YOU will actually SHOW them what they can get.  OH WAIT!!!  AND THEY WILL BE IN THE PHOTOGRAPHS THAT YOU SHOW THEM!!! Your potential clients no longer have to imagine what it will be like to work with you.  YOU are a sure thing, my friend! 

CONS of “The Dressing Room Sessions”

  • If you like photographing your clients for 3-5 hours and pulling poses out of your butt….this may NOT be the best idea for you!

I’ve been working with this new business model for almost a year and a half now, and couldn’t recommend it more.  It’s given me time to work on getting more publications, expanding the business towards the photographic community more, and even take on a few business partners for extra awesomeness!!  This one simple idea has helped create the freedom I’ve been looking for in this wild wedding wonderland of….of…..Washington?  (What?  I ran out of W’s!!)

blog_separator

About the Author:  Terra Dawn is a destination wedding photographer, writer and workshop host located in Washington, D.C.  She’s been featured in print and online publications such as The Knot, Destination Weddings and Honeymoons Magazine, Style Me Pretty and Brides Magazine. Check out her blog for more humor, snark and crazy awesome!
Visit Terra Dawn at her WEBSITE | FACEBOOK today!


Tweet


18 Comments

Guest Contributor Post-Processing

Masking – Think Outside the Box.

by Guest Contributor Amanda Padgett 

Hello fellow photography enthusiasts! Today I am going to show you how to think outside the box when it comes to getting rid of unwanted objects in a picture.

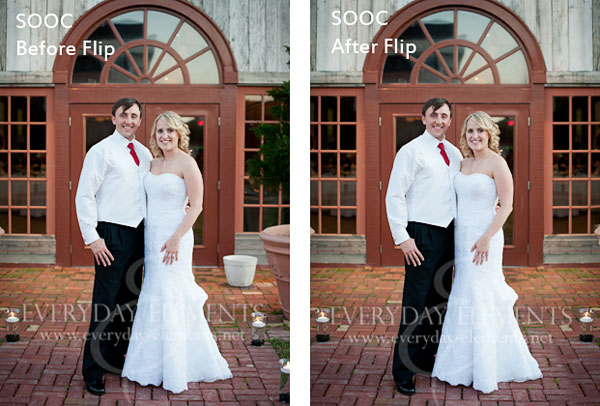
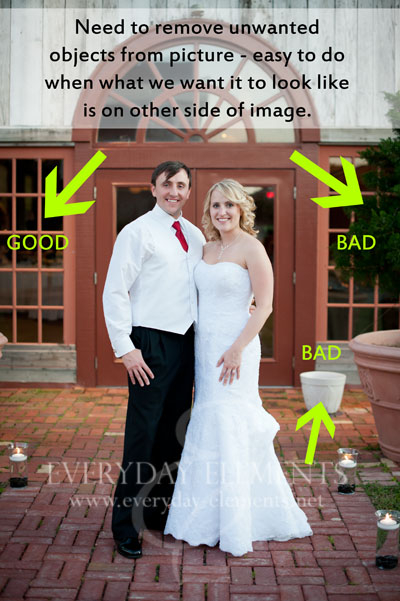
Yes, content aware and clone stamp are fantastic and wonderful and amazing – but sometimes they can be temperamental and it may take a while to get what you want. However, when you have an image that is symmetrical or nearly so, and one side is perfect while the other is wrought with problems, there is a super quick and super simple fix – duplicating the background and flipping the layer horizontally.

Look at the picture above; one side is lovely and perfect while the other side has an unsightly white flower pot and a large potted tree. Since this image was intended to be symmetrical, I am going to build on that and simply copy the good side onto the bad side.

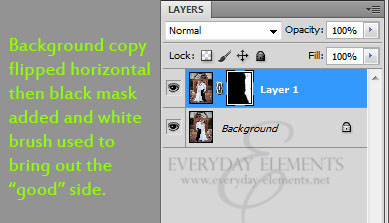
First I duplicated the background (control/command + j). Then I flipped it horizontally.

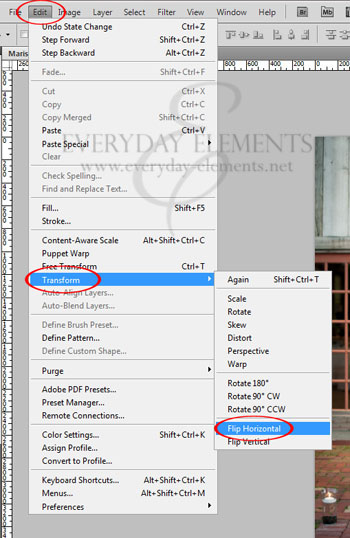
To flip a layer horizontally in Photoshop CS#, go to Edit, then Transform, then Flip Horizontal.

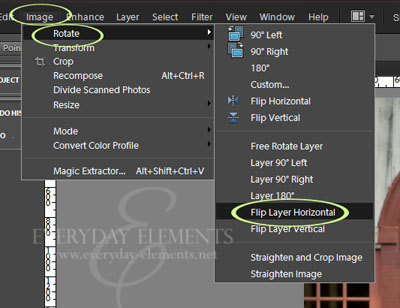
To flip horizontally in Photoshop Elements 10 (and older versions) go to Image, then Rotate, then Flip Layer Horizontal.

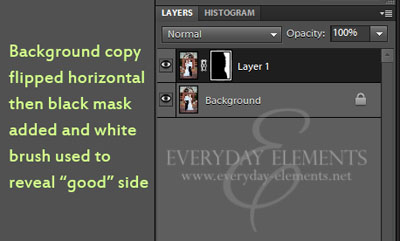
After I flipped the layer so that the “good” side is where I want it, I add a black mask to conceal the whole layer.

To add a black mask simply add a mask using the mask icon at the bottom of the layers palette, then press control/command + i, to invert the mask from white to black.

After inverting the mask to black, use a white brush at 100% brush opacity and brush over the bad area, so that the image (with the good side showing) will be revealed.

The steps are the same in PSE as in Photoshop.

If your “good” image doesn’t line up just as it should, you can use the Move tool (v on keyboard) to move it where you need it to be.

Was that fast or what??

The video tutorial below shows these steps for BOTH Photoshop Elements and Photoshop CS5. The video starts with PSE then moves to CS5. Also, I show another image in the video so you can see another application of this technique.

blog_separator

Hello!  I’m Amanda, a quirky, introverted Mom of four, who is passionate about helping others learn their cameras and editing software. I also currently homeschool my four kids, ages 13 to 6, all whom run away when they see me carrying my camera.

Visit me at my WEBSITE and FACEBOOK page!


Tweet


24 Comments

Guest Contributor

Capturing Your Everyday + Bonus Download

by Guest Contributor Rebecca Cooper

Hey you guys! My name’s Rebecca Cooper. I blog over at Simple as That and I’m super excited to be here guest posting at Rock the Shot today! This is such a fun place to be and I’m not one to turn down the opportunity to chat about one of my favourite things – photography of course – so here I am!

Weddings, newborn babies, families…I’ve photographed them all, but over the years I’ve realized that I find the most joy and fulfillment in capturing photos of my own family, just living our completely ordinary life. When viewed through my lens, the simplest of moments can be  transformed into beautiful images and I value the greater appreciation I find for the seemingly mundane, as I seek out photo opportunities amidst my everyday life.

Capturing life as it happens helps me see things differently. Boring becomes beautiful, ordinary becomes extraordinary and I gain a greater appreciation for the simplest things around me. I don’t know about you, but a reminder to slow down and just enjoy, is one that I need daily. Life can get so busy and there are so many distractions to take our focus off what matters most.

It was with these thoughts in mind that I decided to issue a photo challenge to myself and to anyone else who wanted to join me, a little over a year ago and that’s when Simple things Sunday began. The challenge was to capture a photo once a week of a simple joy or simple moment that made you smile and what started out as a fun idea for a photo project quickly became so much more.

The challenge to capture that one little photo each week has helped me be more aware of the beauty in the everyday and I’ve come to appreciate this weekly challenge so much.

If you’d like to join us for Simple things Sunday you can find all the details here! We’d sure love to have you! 🙂

Capturing everyday photos isn’t always easy. There are less than ideal lighting situations to deal with, life’s moments happen so quickly, sometimes they’re easy to miss and let’s face it, we’re busy and pulling out the camera on a regular basis isn’t always realistic. But I promise you, that no matter what the challenges, capturing these photos is so worth it.

Tips for capturing your everyday:

1. Keep your camera somewhere easily accessible. If you can grab it quickly and its out in plain view you’ll be more likely to actually take those daily photos.

2. Keep things simple. Switch to AV or A mode or even auto and let the camera do the work. Moments are gone before you know it, playing around with camera settings might mean missing the shot.

3. Be ok with imperfection. Life isn’t perfect. Photos of that beautifully imperfect life don’t need to be either.

4. Play with angles. Take an ordinary photo to extraordinary with a change in perspective.

5. Know when its time to put the camera away and be in the moment. Don’t sacrifice the moment for the memory. Being present is never a bad idea.

6. Get in some of those photos! Your camera’s self timer is a wonderful thing. Learn how to use it, experiment with it. It can be so fun and if you don’t have a remote, running from behind the camera to get in the shot is totally considered exercise! I’m serious.

7. Make a list of everyday photos you’d like to capture. I find that when I’m in the moment I can’t always think of photos I want to take, I need a list to help me. Jot those ideas down on your calendar or make them part of your daily to do list. Download my Everyday Photo Checklist to help get those ideas flowing.

“Normal Day, let me be aware of the treasure you are. Let me learn from you, love you, bless you before you depart. Let me not pass you by in some quest of some rare and perfect tomorrow. Let me hold you while I may, for it may not always be so. One day I shall dig my nails in the earth, or bury my face in the pillow, or stretch myself taut, or raise my hands to the sky and want, more than all the world, your return. ” Mary Jean Iron

Viewing everyday life through the camera lens can be refreshing. It brings a new perspective, it makes us more aware and helps us see the ordinary in an entirely different light. I see my camera as a tool to help magnify the simple beauty that surrounds me each day. Sometimes that beauty is easy to find, sometimes it isn’t, but with my camera in hand I’m determined to capture those everyday moments as they come and learn to appreciate them before they are gone.

Thanks so much for having me at Rock the Shot today! It’s been a blast and if you have a chance to stop by my blog to say hi or join us for Simple things Sunday sometime that would be so fun!  Have a great weekend!

blog_separator

Rebecca is a small town girl from rural Southern, Alberta, Canada. Her and her family recently returned home from 18 months spent living on a tiny island in the Caribbean where she enjoyed a hiatus from professional photography and passed the time photographing their beautiful surroundings and their everyday life. Rebecca writes a blog, Simple as That, and has authored two photography eBooks:
40 Top Tips for Better Photos and Don’t Say Cheese! How to get great, natural photos of your kids.If you liked her downloadable Everyday Photo Checklist be sure to stop by her blog to download her spring, summer, fall, back to school and holiday checklists as well.


Tweet


13 Comments

Guest Contributor Post-Processing

Color Space Confusion – Simplified!

by Guest Contributor Angela Vaughters

Color Spaces.  Adobe RGB 1998 versus sRGB versus ProPhoto RGB, etc.  8-bit versues 16-bit.  Ahhh!  The confusion!  To make matters worse, leaving your programs at their defaults may cause unexpected results when you go to display your images in print or on the web (color shift, anyone?).

I will attempt to simplify things a bit by letting you know the method I’ve found to work.  If you are like me and you capture images with the intention of posting them on the web and getting them printed, these steps should work for you, too.

Here’s the thought… photos saved for the web must be 8-bit and in sRGB color space.  Most printing labs only accept files in JPEG format (which means they are 8-bit) and in sRGB color space.  Therefore, the method I use focuses on producing images in 8-bit, sRGB format.

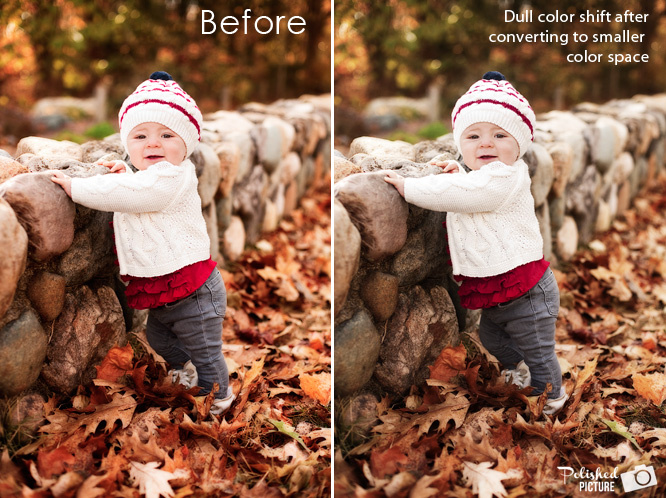
I know other color spaces have a wider gamut, but if my output (web and print) cannot use those additional colors, there is no advantage for me to use them in my workflow.  As a matter of fact, if I start in one of the larger color spaces and at the end of my workflow convert my images to sRGB, I will lose color info and end up with dull colors in my final images.  It’s happened before (sniff, sniff!).

Here’s an example of a color shift happening when I edited the image in Adobe RGB and then converted to sRGB before saving:

This problem can be avoided by keeping your color space consistent throughout the entire capture and editing process.

Here are all the areas to set your color space and bit-depth:

Set your camera’s color space to sRGB:
If you shoot RAW, your camera’s color space setting will actually not have an impact on the image file since RAW files contain all the information that hits your camera’s sensor.  However, your camera will use the color space setting to generate both the preview on your LCD screen and the histogram.  If you shoot JPEG, the color space will be used when your camera converts the captured data to a .jpg file.

Set Color Space Preferences in Lightroom:  There are 2 locations for this:

1. The Preferences Menu (Mac: Lightroom → Preferences or PC: Edit → Preferences).  In the ‘External Editing’ tab, set the Color Space to sRGB and Bit Depth to 8 bits.

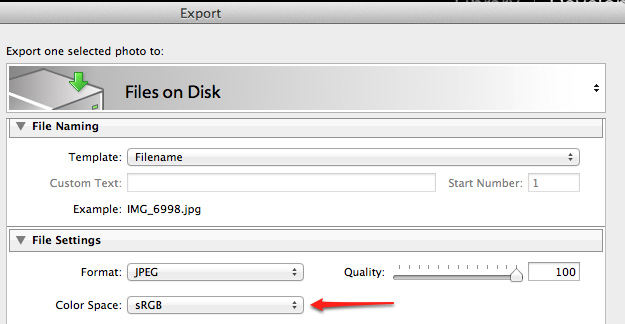
2. In the Export dialog (when you are exporting images).  If you are exporting your file as a .jpg (as I do), you just need to make sure that under ‘File Settings,’ Color Space is set to sRGB. (JPEGs are already 8 bits, so you don’t need to set that).

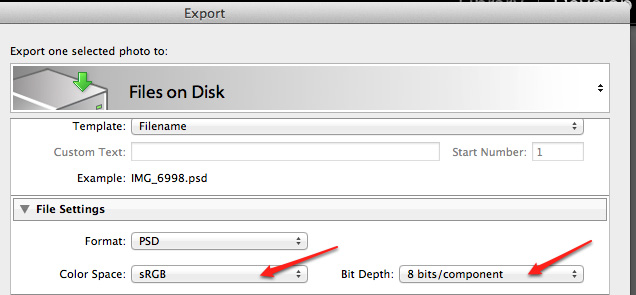
If you export your images in PSD format, it will give you the option to set the Bit Depth as well, so make sure it is set to 8 bits.

Set the Color Settings in Photoshop to sRGB:
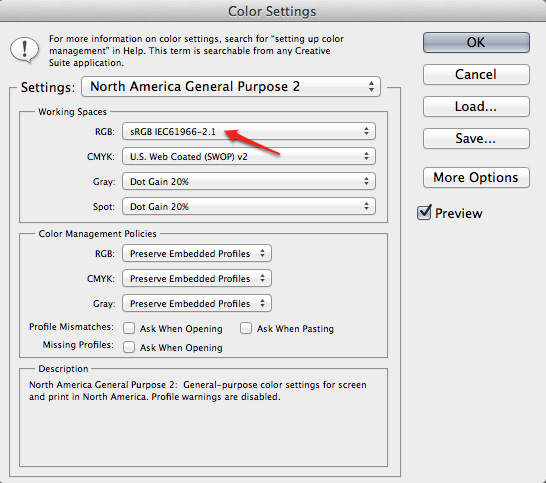
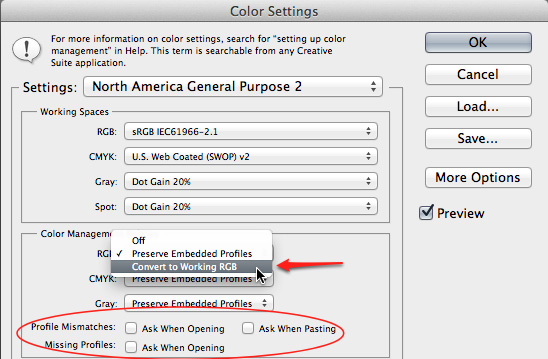
Go to Edit → Color Settings.   Under Working Spaces → RGB, choose sRGB.

All of my photos come into Photoshop from Lightroom, so I know they are coming in as 8-bit, sRGB files.  If you have any doubts, you may want to change your Color Management Policies.

The way it’s set in the diagram above is to ‘Preserve Embedded Profiles’ – meaning that if you open an Adobe RGB file, for instance, Photoshop will keep the file in Adobe RGB.  However, you can have Photoshop automatically convert a mismatched profile to your desired color space (in our case, sRGB) by selecting ‘Convert to Working RGB’.  You can also have Photoshop notify you of any profile mismatches by checking the boxes (circled below).

You can set up the Color Management Policies according to your own personal preferences.
Note:  If you use Adobe Camera Raw at all, color space and bit-depth settings are at the bottom of the window, directly under your image.  You can click on them to change them as necessary.

And that’s it!  You are now set up for getting consistent color in your images from start to finish.

If your needs are different (maybe you have a wide-gamut monitor and you only print to a color-managed inkjet printer, for instance), of course you can tailor these settings to your needs.  The idea is to keep things consistent so you don’t experience unexpected color shifts!

Happy Editing!

blog_separator

About the Author:  Hi, I’m Angela!  I am a computer programmer turned mom turned photographer turned I’m-not-sure-what!  As a new photographer, I had spent so much time staying up late and piecing together information, trying to figure out how to edit my photos.  I created Polished Picture to be a photo editing resource, sharing what I’ve learned on my photo journey – mostly through lots of trial and error!

Visit Angela at her WEBSITE | PHOTO BLOG | FACEBOOK today!


Tweet


8 Comments

Guest Contributor

55 Smart Web Ideas for Photographers Ebook

This 60 page ebook from Zach Prez and Wendy Roe helps photographers optimize their website, WordPress blog, and Facebook Page. Learn to drive more qualified clients to your site and prime them for purchase!

55 Smart Ideas for Photographers is perfect for wedding, family, or senior photographers who have a basic understanding of web marketing and want dozens of quick ideas for growth. It is easy to digest and implement with one key idea and takeaway per page.

Effective practices outlined in this book:

  1. Optimize and engage your Facebook Page to WOW potential clients and generate dialogue, loyalty and traffic.
  2. Make your blog a traffic magnet by highlighting vendors, naming posts correctly and encouraging comments.
  3. See a site through Google’s eyes and learn what factors lead to a quality rank.
  4. Create an expanding email list to communicate with subscribers about specials, exciting work, new products, industry trends and helpful resources.
  5. Point all marketing to a web hub where you control the branding, content, and engagement.

Put yourself in your clients’ shoes

Most clients need common questions answered before they purchase. They want to know who recommends you, what experience you have, how much your services cost, and if they’ll be comfortable working with you. A goal of your web marketing is to answer the questions your clients want to ask.

We teach you how to answer the basic marketing questions which leads to more contact requests for your services.

Web marketing is working when the phone rings

A number one Google rank and thousands of Facebook followers don’t translate to booming business. Those starting points for traffic still need to convert potential clients into customers who make contact and book a session. It’s about getting more traffic across your entire web presence and driving those visitors to contact you for a potential sale opportunity.

Our marketing ideas help drive traffic to your websites, and turn that traffic into phone calls.  Click here to view more about this amazing ebook!

Photography leaders who contributed

We included tips from some of the top photographers and marketers in the industry.

Kevin Kubota: Send out a customer service survey
Andrew Funderburg: Using YouTube to Help SEO
Jules Bianchi: Showcase Vendors to get others talking about you
Jared Bauman: Blog writing tips for the non-writer
Khara Plicanic: Nontraditional posts attract comments and connection
Seshu: Generate traffic with Twitter
Michael Corsentino: Use a blog series for repeat visitors
Mike Rheaume: Stumble your way to the top
Marty Thornley: Own your content
Leah Remillet: Leave a trail with watermarks

blog_separator

Co-author Wendy Roe spent the last 10 years ingrained in all things web marketing—from design and development to search and social media—often being the interpreter between geek speak and client strategy. She now focuses her time on business development and as a second shooter for Byron Roe Photography while speaking, mentoring photographers build the most of web marketing. Join her at an upcoming PUG event, at WPPI for her 2012 workshop or at Image Explorations in Vancouver, BC.


Tweet


Leave a Comment

  • « Previous Page
  • 1
  • …
  • 22
  • 23
  • 24
  • 25
  • 26
  • …
  • 30
  • Next Page »

Popular Categories

You might also like

Love of Lifestyle Photography Workshop by Ashley Spaulding

Love of Lifestyle: The Fundamentals of Lifestyle Photography

The Lightroom Lab: An 8-Week Course to Mastering Lightroom

Pretty Forum for Photographers

Let Them Eat Cake—A Marie Antoinette Inspired Shoot

Tips to Keep Your Images Interesting in Limited Surroundings

Natural Light: The Art of Finding Magical Light

Copyright © 2025 · Divine theme by Restored 316

Copyright © 2025 · Divine Theme on Genesis Framework · WordPress · Log in

×
Never miss a thing!
Sign up for Pretty Forum Newsletters and get all the latest news on our upcoming:
  •  
    ​Workshops
  •  
    Celebrity Mentors
  •  
    Free Downloads 
  •  
    Photo Challenges
  •  
    Vendor Discounts
  •  
    and much more...